There are two ways your members can access your private Hub:
- By importing your Contactsand sending them a Hub welcome email, or
- By allowing your members to register (and potentially pay) for your Hub themselves.
NOTE: You must enable the Hub Registration page so your members can register first before getting access to your Hub.
Step 1 - Set your Hub to Private
Start by setting your Hub to Private in the Settings Tab

By doing so, only users who register with their email can access your Hub, unlike a Public Hub, which anyone can access via a link. A member profile is created automatically upon registration.
You can toggle your Hub to Private inside your Hub Preview.
Step 2 - Toggle on your Registration Page
Once the Hub is set to Private, go to your Hub Editor by clicking Customize.
Under User Management, click Register.
From there, ensure that the Visibility is set to Public and click Save.

Step 3 - Edit your Registration page
You can make a great first impression on your members when they access your Hub by customizing the Registration page.
Jump to your Hub Editor by clicking Customize in the top-right corner. Open your Pages menu and then click Register under "User Management".
From here, you can make changes to your registration page's left and right sections, such as uploading a logo and background image, or modifying elements and tabs.
Here's a quick tutorial:
-3.gif?width=670&height=377&name=Untitled%20design%20(3)-3.gif)
Step 4 - Share your Hub registration page with your Members
Once you've set up your Registration page, simply share your Hub's sign-up URL, and any new members will automatically be taken to your Registration page.
You can find your Register URL in the top-left corner when you're on the Register page editor.
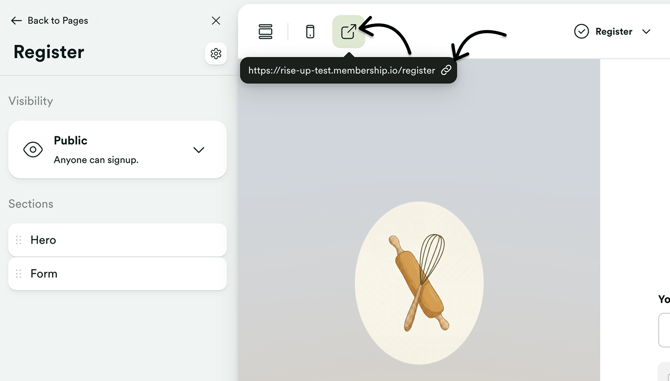
The same thing can be obtained by clicking the three-dot menu on your Hub's main screen.

(Optional) Step 5 - View who has registered for your Hub by creating a Segment
If you want to track who has registered for your Hub and possibly export this information, you can create a Segment inside Members by setting the conditions to include whoever has access to the Hub.

(Optional) Step 6 - Turn off Registration when closing the cart
This is more important if you are using Stripe Integration to collect payments from users. To stop Hub sign-ups, simply hide the Hub registration page by changing the visibility back to Hidden.

Make sure to click Save Changes.