AI Screen Recorder control guide
Understand the controls and recording process for the Membership.io Chrome Extension
For information on what the AI Screen Recorder Chrome Extension is and how to install it, check out our article on setting up and using the AI Screen Recorder.
Understanding the interface
Before you start recording, click the three-dot menu so you can:
- Choose your preferred window size;
- Set the max video resolution (fast internet upload speed is recommended for seamless uploads);
- Include/exclude system audio;
- Restore your last recording; or
- Download system information and video data and send for troubleshooting.

Below is a detailed breakdown of the extension interface.
Record
Screen: Record the entire screen, browser/app window, or a Chrome tab.- Camera recording: When enabled, you can use your camera to capture yourself on video. A "talking head" video of yourself will be displayed alongside the screen or tab you're recording. Toggle buttons are now available to flip video and use background effects!
- Audio recording: When enabled, you capture sound while recording. You can also toggle the switch button to turn on the Push to Talk feature when needed.
Tab area: Record only the current tab you're on.
- Camera and audio recording
- Setting an area to record: When enabled, you can specify the recording area to capture only the content within that area.
- Camera and audio recording
Your videos
Clicking the tab will bring you to your Library, where all your Chrome extension recordings are saved.
Advanced Settings
Click Show more options to review all the options you might need to configure before recording your screen. Note that you have to configure the advanced settings for each recording option.

- Hide toolbar: Show or hide the recording toolbar at the bottom left of the screen.
- Countdown: Enable or disable the 3-second countdown timer before the recording starts.
- Set a time limit: Set the number of minutes and seconds for your recording to stop.
- Microphone off warning: Enable or disable the warning when no active microphone is detected.
- Stay on the page when recording: When toggled, this will allow continuous same-page recording even if you switch between tabs/windows/apps.
- [Experimental] Zoom to cursor: This super cool feature allows you to zoom in to the precise location where the mouse cursor is pointed when turned on.
To start recording, simply click the ⏺️ Start Recording button on the main interface.

NOTE: Please be aware that certain websites, such as Facebook and Instagram, may block the use of the Chrome Extension or other third-party recording apps from accessing your device's camera and microphone. This limitation may affect the extension's functionality, but it is a common restriction imposed by these sites.
Using the Control Menu during recording
Once the recording has started, you can use the movable floating controls in the bottom left to perform different actions, such as annotating your recording.

NOTE:
- Toggle drawing tools: This opens the annotation tools.
- Toggle blur tool: It allows you to select and blur elements immediately.
- Toggle cursor options: This lets you select the appropriate cursor type for different functions, such as highlighting and emphasizing elements or areas.
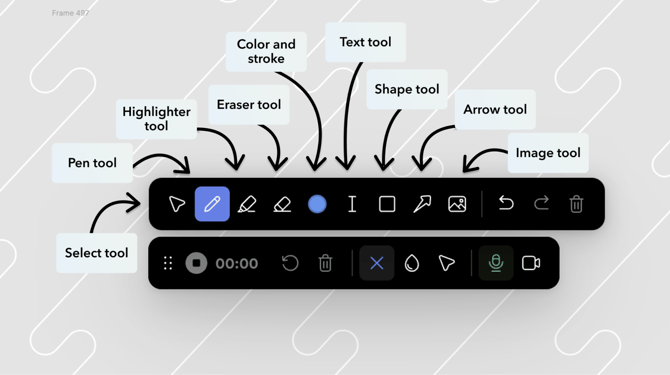
Clicking the ✏️ icon opens the Annotation menu. This menu allows you to draw, highlight things, and do more on your recording.

When you click the annotation icon, you'll have these options (from left to right):
- Select tool: Select different elements you've drawn on your canvas
- Pen tool: Draw freehand in your chosen color anywhere on your canvas
- Highlighter tool: Emphasize text and other details
- Eraser tool: Delete anything you drew
- Color and stroke: Choose the color and thickness of your drawing
- Text tool: Enter text anywhere on your canvas
- Shape tool: Draw a shape outline/fill
- Arrow tool: Point out details seen on your canvas
- Image tool: Upload images from your local storage
- Other options: Undo, Redo, and Clear canvas
Here's a quick demonstration of the drawing/annotation tool. Let's see it in action:

Viewing your recorded video
When you're done recording, your browser will open a new tab to process the video and allow you to view it. You can search within the video transcription (when available), instantly share your recording, or click Edit to go straight to your Library and make changes!

Processed video recordings are saved to your Membership.io Browser Extension folder in the Library.