
Custom pages are used to design personalized internal layouts inside your Membership.io Hub, create tailored onboarding flows and landing pages, and organize specific content or community spaces. You can mix default pages with custom pages to create the best experience for your Hub members.
This guide walks you through creating a custom page and making it available to your members.
Step 1 – Access the Hub Editor
From the Hub dashboard, click Customize to open the editor. In the left sidebar, you’ll see the page categories.
Step 2 – Create a custom page
Click the plus icon (Create Page) to add a new custom page. In the pop-up display, enter a name for your page and set the privacy. Click + Create Page to complete the step.
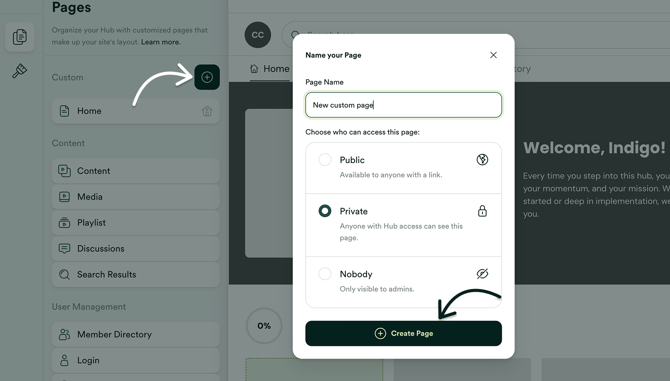
💡TIP: Set the page privacy to Nobody temporarily while you're still designing your page, then change it later when you're ready to make it visible to your members.
Step 3 – Customize your new page
After creating the page, you can:
- Add sections and content blocks
- Upload images or videos
- Add buttons, forms, or other supported elements
- Adjust the page layout to fit your content
For detailed guidance, see Section Customizationin our Help Center. Make sure to save your changes as you build to avoid losing your work!
Step 4 – Add the Page to Your Navigation (if needed)
Creating a custom page doesn't automatically make it visible in your Hub's navigation. If you'd like members to access it from your menu, add it to your Hub navigation.
Additional Steps
After the steps above, you can select a Parent Pageyour custom page will return to when your members click the "Back to" button.
You can also customize the URL slug to create a cleaner, easier-to-share page URL.