
🧰 What You Will Need:
-
Someone with legal authority to sign for your business or organization
-
A D-U-N-S number for your organization
-
A form of payment for the $25 USD Google Play fee and the $99/year Apple Developer fee
Guide Purpose
Part 1 covers everything you need to set up before the technical work begins: your Google Play and Apple developer accounts, a Hub that looks right on mobile, the screenshots and store details you'll use later, and your app's look in the Membership.io builder. Start as early as you can, because developer account approval can take 2 to 3 weeks.
Table of Contents
➡️ Feel free to click on any link to dive deeper into what's being mentioned.
- Configure your Play Console developer account
- Configure your Apple developer account
- Finalize and audit your Hub
- Prepare your app screenshots
- Prepare your app store details
- Customize your app in the Membership.io builder
Step 1 - Configure your Play Console developer account
Register your organization with Google so you can publish on Google Play.
Before you can publish your app on Google Play, you need a Google Play Console developer account that is registered to your organization. This step walks you through what you need and how to set it up.
IMPORTANT: Only a person with full authority in your business or organization should complete this step. You can't outsource it to a team member, because Google will ask you to confirm that you have the power to bind your organization to agreements and contracts.
Get a D-U-N-S number
- Get your D-U-N-S number at https://www.dnb.com/.
- Choose the Gmail account you'll enroll for the developer account. If you don't have one yet, create one at https://accounts.google.com/.
Create an organization Play Console developer account
- Go to https://play.google.com/console/u/0/signup.
- Create your organization's Play Console developer account.
- Complete each of the Google Play Console onboarding requirements listed below.
Google Play Console onboarding requirements
- Two-Step Verification (2SV): This is mandatory on your Google account before you can access Play Console at all.
- A D-U-N-S number: Google uses it to verify your organization. Register as an organization, not as yourself, and work through the steps to register your organization.
- A phone number and email address: These are shown on your public Developer Profile.
- A contact phone number and email address: Only Google uses these, to contact you.
- A form of payment: You'll pay a one-time registration fee of $25 USD.
- A government-issued photo ID: Google verifies your identity with it during onboarding.
ID verification typically takes 24 to 48 hours after you submit it. Your app can't be published until verification is complete, so don't leave this to the last minute.
NOTE: If you didn't complete a D-U-N-S number, you haven't finished registering as an organization. You can double-check in Google Play Console at https://play.google.com/console. Google has additional documentation on how to create your developer account. If you later need to confirm your organization registration or verify your website, Part 4 Step 1 includes those steps.
NOTE:
- If you didn't complete a D-U-N-S number, you haven't finished registering as an organization. You can double-check in Google Play Console at https://play.google.com/console.
- Google has additional documentation on how to create your developer account.
- If you later need to confirm your organization registration or verify your website, Part 4 Step 1 includes those steps.
Getting help with your Play Console account
For support with your Play Console account, see the Play Console Help page. The Membership.io team can't help with your Play Console account configuration, because our team doesn't have access to your account.
Step 2 - Configure your Apple developer account
Enroll in the Apple Developer Program so you can publish on the App Store.
To publish your app on the Apple App Store, you need an Apple Developer account. This step covers what to prepare and how to enroll.
Before you start
- Turn on two-factor authentication for your Apple ID. You won't be able to proceed without it. Set this up in your Apple ID account settings before you start enrolling.
- Check that the name on your Apple ID matches your government-issued ID exactly. Nicknames or shortened names will cause delays. Update your Apple ID now if needed.
Enroll in the Apple Developer Program
- Make sure you have an Apple account to enroll. If you don't have one, create it at https://account.apple.com/account.
- Go to https://developer.apple.com/programs/enroll.
- Enroll your Apple account in an Apple Developer account.
- Complete each of the enrollment requirements listed below.
What Apple will ask you for
- Accept the Developer agreement.
- Give your legal full name and full mailing address.
- Provide government-issued photo identification.
- Provide proof that you have the authority to sign legally binding documents.
- Verify your information by phone, email or text.
- Provide a form of payment for the account fee ($99/year).
Getting help with your Apple developer account
For support with your Apple developer account, see Apple's Developer Support resources. The Membership.io team can't help with your Apple developer account configuration, because our team doesn't have access to your account.
Step 3 - Finalize and audit your Hub
Before your app goes live, make sure your Hub is ready. This one step will save you a lot of headaches later.
Why this step matters
Your app is a direct reflection of your Hub. Every page, section and piece of content in your Hub appears exactly the same way in your app. If something looks off on mobile now, it will look off in your app too.
Most members build their Hub on desktop and never check how it looks on a phone. Mobile is where your members will spend their time: scrolling through content, watching videos and completing lessons. Your Hub audit is how you make sure that experience is seamless.
How to audit your Hub
- Open your Hub editor.
- Toggle to the mobile view. See Optimize your Hub sections for mobile for where to find the mobile preview and how to set section device visibility.
- Go through every page as if you're a member visiting for the first time.
- On each page, check the questions listed below.
- Fix anything that looks off before you move on.
Questions to ask on every page
- Does the layout look clean and readable?
- Are images and banners cropped or distorted?
- Is text easy to read?
- Do buttons and CTAs appear where they should?
- Does navigation feel intuitive?
Common things to fix
- Banner images that are too wide or cut off on smaller screens
- Text blocks that overflow or feel cramped
- Sections that look great on desktop but stack awkwardly on mobile
- Broken links or placeholder content you meant to update
Before you move on
You're ready for the next step when you can say yes to all of these:
- I've reviewed every page of my Hub on a mobile screen.
- Images and banners look clean and aren't distorted.
- Text is readable without zooming.
- Navigation feels smooth and intuitive.
- I've fixed anything that looked off.
Updating your Hub after launch
You can update your Hub any time after launch, and your app reflects those content changes automatically with no extra steps. Starting with a clean, mobile-ready Hub means your members get a great first impression from day one.
IMPORTANT: Changing your Hub's URL or domain is different. Your app is configured to point at the domain you set up during this mobile app process. If you change it later, you'll need to update the domain in your app settings and trigger a new build, which then goes through store review again before it's live. It's not hard, but it's not instant like a content edit. If a domain change is on your radar, plan for it now. Part 4 Step 1 explains how to update your Hub URL after your app is published.
It's not hard, but it's not instant like a content edit. If a domain change is on your radar, plan for it now. Part 4 Step 1 explains how to update your Hub URL after your app is published.
Step 4 - Prepare your app screenshots
Capture and brand the screenshots both stores require.
Apple and Google Play both need screenshots of your app for your store listing. This step walks you through capturing screenshots of your Hub and turning them into branded images at the right sizes.
🔴 Video coming soon: app screenshot creation
See examples from other creators
Here's how other creators have set up their app listing screenshots and details:
- Heal Your Life+ App on the Apple App Store
- Better Pickleball Academy App on the Apple App Store
- Membership.io Community App on the Play Store
- The Membership Experience App on the Play Store
What you need to know
Apple and Google Play require 3 app screenshots for each of 3 device types: an iPhone, a tablet and an Android device. Your screenshots should show your Hub as it appears.
We recommend one screenshot of your homepage, one of a piece of content, and one of your community. Here's an example of what your finished screenshots will look like:
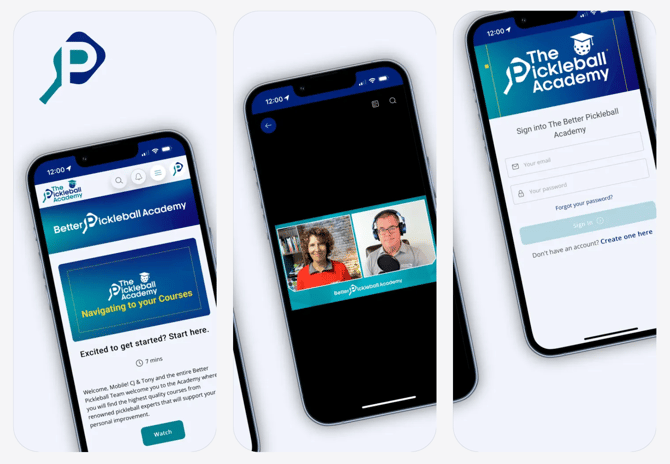
You'll use a free Chrome extension called Mobile First to capture the screenshots, then use Canva to brand them and export them at the proper dimensions.
Capture your screenshots with the Mobile First Chrome extension
- Go to https://www.webmobilefirst.com/en/ and download the free Chrome extension.
- Once the extension is downloaded, pin it to your bookmarks.
- In Chrome, open your Hub in a new tab.
- Toggle on the Mobile First extension.
- Open the Change Model menu and select one of these devices: Google Pixel 6 PRO (Android phone), iPhone 14 Plus (Apple phone) or iPad Air 4 (tablet).
- Click the gear icon at the bottom to open Configuration.
- Under OS Display, click the middle option, which says "Hides the browser but keeps the OS status bar."
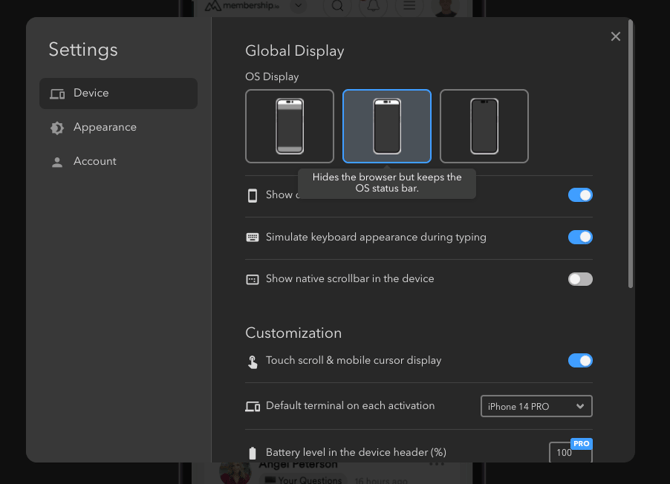
- When your screen is ready, open the Take a screenshot menu (camera icon).
- Click Generate a capture.
- Save the image as a PNG file.
- Repeat until you have 3 screenshots for each of the 3 devices (Google Pixel 6 Pro, iPhone 14 Plus and iPad Air 4).
Create your app screenshot images in Canva
Once all your screenshots are saved to your computer, compose the screenshot sets in Canva. Each device type needs a different image size, and you need 3 images per device.
Use the templates below to drop in your screenshots, change the background colour and add your logo. You can get creative, as long as the devices and screenshots are an exact match of what members will find in your Hub.
Create 3 images with each of these size templates:
- Android, 1080 x 1920 px: Create your template here
- iPhone, 1242 x 2688 px: Create your template here
- iPad, 2064 x 2752 px: Create your template here
When your images are done, keep them somewhere safe. You'll need them in Part 3, when you prepare your store listings in Part 3 Step 1 (App Store Connect) and Part 3 Step 2 (Google Play Console).
Step 5 - Prepare your app store details
Draft your store listing details before submission day.
When your app is ready to submit, the Apple App Store and Google Play Store both ask for your listing details: your app name, description, keywords, category and contact info. This step helps you get that information ready ahead of time, so you're not staring at a blank form on submission day.
None of this is complicated, but it does take a little thought. Here's what you'll need.
App name (30 characters max)
This is the name that shows up in the App Store and Google Play. Keep it short, clear and recognizable, and make sure it reflects your brand and what your membership is about.
- Draft your app name.
- Count the characters to make sure it's 30 or fewer.
- Search both the Apple App Store and Google Play Store to make sure the name isn't already taken.
IMPORTANT: Your app name must be unique. Make this decision now, otherwise you won't be able to move forward in Part 2.
Primary store page language
This is the default language your listing will display in. For most members, this will be English.
Long description (up to 4,000 characters)
This is the full description on your app's store page. Think of it as your pitch to a potential member who comes across your app, and make sure it accurately reflects what members will find in your app.
You don't need to use all 4,000 characters, but you do want enough to be compelling. Draft it now so you're not writing it under pressure.
Apple App Store: additional requirements
Category
Choose a category from Apple's list that best fits your content. This helps people discover your app while browsing.
Keywords (100 characters, comma-separated, no spaces)
Example: yoga,meditation,fitness,wellness,mindfulness,health
These are the search terms that help people find your app. Think about what your ideal member would type into the App Store. You have 100 characters in total, so use them wisely, and don't put spaces after the commas.
Age rating
The default is 4+, which works for most memberships. If your content includes mature themes, you may need to change this.
Google Play Store: additional requirements
Short description (80 characters)
This appears below your app name in search results. It's your one-sentence hook, so make it count.
Category
Same idea as Apple: pick the category that best matches your content.
Store listing contact details (shown publicly)
Google requires a contact email on your listing. Use a support or business email you check regularly, because this is what members will see if they have questions.
Your checklist
- App name (30 characters max, unique on both stores)
- Primary store page language
- Long description (up to 4,000 characters)
- Apple category
- Apple keywords (100 characters, comma-separated, no spaces)
- Apple age rating
- Google Play short description (80 characters)
- Google Play category
- Public contact email for Google Play
Having these details ready means that when it's time to submit, you're filling in blanks instead of starting from scratch. You'll use them in Part 3 Step 1 and Part 3 Step 2.
Step 6 - Customize your app in the Membership.io builder
Design your app icon, launch screen and settings in the Membership.io builder.
This is the fun part. Membership.io has a built-in app builder that lets you preview and customize how your app looks before it goes to the stores. Everything you set up here is packaged into your build in Part 4.
Open the builder
- Go to your Hub dashboard.
- Click to open the Mobile menu.
You'll see a live preview of your app and a row of customization panels: App Icon, Appearance, Notifications and Settings. This step covers App Icon, Appearance and your app name in Settings. You'll fill in the rest of Settings and the Notifications panel in Part 2, once your credentials exist.
App Icon
- Click the App Icon panel.
- Upload your app icon. A square 1024 x 1024 PNG is recommended. This is what shows up on your members' home screens.
- Set the Background colour. This sets the colour behind your icon for the app store presentation, and it's only visible if your icon has transparency.
The live preview updates in real time as you make changes.
🔴 Watch: Uploading your app icon and setting its background colour (Loom video)
Appearance
Click the Appearance panel. This is where you customize the look and feel of your app.
- Launch Screen Logo: The logo that appears while your app loads on first open. If you leave this empty, it defaults to your app icon.
- Launch Screen Background: The background colour for the launch screen.
- Status Bar Background: The colour of the status bar at the top of your app, where the time, battery and signal icons sit.
- Status Bar Text Colour: Toggle between Dark and Light to suit your status bar background. Use light text on a dark background and dark text on a light background.
🔴 Watch: Setting your launch screen (splash screen) logo and background (Loom video)
🔴 Watch: Setting your status bar background and text colour (Loom video)
NOTE: The live preview shows your status bar and Hub content, but it doesn't preview your launch screen. You'll see your launch screen in action when you install the app on your phone for the first time in Part 4 Step 2.
Settings
Click the Settings panel.
- App Name: Enter the app name you chose in Part 1 Step 5.
- Universal and App Links: Toggle this on so links to your Hub automatically open in the app instead of staying in the browser.
🔴 Watch: Setting your app name (Loom video)
The rest of the Settings panel holds your app IDs and build credentials. You'll create those in Part 2 and check them here in Part 2 Step 4.
Your changes save as you go
Every change saves to your Hub, but no build is triggered until you press the build button in Part 4 Step 1. You can come back and tweak the design any time, even after the app is live in the stores.
NOTE: Changes in the app builder (app icon, app name, launch screen logo and status bar) require a new submission to the app stores. Changes in the Hub editor update live for members.
Congratulations! 👏 You've finished Part 1: your developer accounts are in progress, your Hub is mobile-ready, your screenshots and store details are drafted, and your app's look is set up in the builder.
Take It Further …
- Mobile App Part 2: Create Credentials
Connect your Apple and Google developer accounts to Membership.io, create your app in both stores and set up push notifications.
➡️ Continue to Part 2