
🧰 What You Will Need:
-
Access to App Store Connect, Google Play Console and the Membership.io app builder
-
Your completed listings from Part 3 Step 1 and Part 3 Step 2, including a working demo account login for reviewers
-
At least one iPhone and one Android device for testing, with the free TestFlight app installed on the iPhone
-
30 to 60 minutes to complete your App Store submission
Guide Purpose
Part 4 is where you ship. You'll build your app and fix any errors, test it on a real device, and submit it to Apple and Google for review.
Table of Contents
➡️ Feel free to click on any link to dive deeper into what's being mentioned.
Step 1 - Build and troubleshoot
Trigger your first build and fix anything that fails.
Time to compile your app. The Membership.io builder hands your configuration, assets and credentials to our build pipeline. The pipeline produces an iOS .ipa and an Android .aab and uploads both straight into App Store Connect and Google Play Console.
You don't have to watch it the whole time. Once you trigger a build, you can close the tab and check back in 15 to 30 minutes per platform.
1A - Trigger a build
- In the Mobile App Builder, find the publish button on the builder dock.
- Open the publish flow.
- Choose which platforms to build: iOS, Android or both. By default, any platform that has full credentials and is enabled is selected.
- Confirm.
You'll see a confirmation that your build has been queued.
NOTE: If a platform shows as unavailable in the publish flow, either its credentials aren't fully filled in or the platform has been disabled. Go back to the relevant builder panel (Settings or Notifications), finish that platform, and try again.
1B - Watch the build status
- Open the build status panel from the builder dock.
- Find the build you queued at the top, with one row per platform you selected.
Each platform row shows where the build is in the pipeline. In broad strokes, a build moves through these phases:
- Queued: Waiting for an open build slot.
- Building: Actively compiling. This is the long phase, about 15 to 30 minutes.
- Uploading: Sending the binary to App Store Connect or Play Console.
- Completed: Accepted by the store and waiting for you to add it to a release.
- Failed: Something went wrong (see 1C).
You can leave this page and come back any time. The status updates when the panel loads.
💡 TIP: Once a row reaches "completed" and the panel shows the store has accepted the binary, you're cleared to move on to Part 4 Step 2.
1C - Fix common causes of failed builds
If a build fails, the build status panel shows an error. Most failures fall into one of these categories.
1. Push credentials are missing or incomplete
You enabled iOS Push and/or Android Push but didn't finish the push setup for that platform. Open the notifications panel and complete the missing pieces. Refer back to Part 2 Step 3.
2. Bundle ID (iOS) or package name (Android) mismatch
The identifier in your builder settings doesn't match what's registered in App Store Connect or Google Play Console. All sides must match exactly, character for character, and Firebase's package name must match Google Play Console's. Pick one as your source of truth and update the others.
3. Signing key (.p8) was rejected
The APNs Auth Key Apple issued is corrupted, expired or revoked. Generate a new APNs Auth Key (3A in Part 2 Step 3) and upload it (3B).
4. Firebase service account permission issue (Android)
The service account key wasn't granted enough permission to send pushes. Generate a new key in Firebase (don't reuse the old file), as described in 3C of Part 2 Step 3, and upload it again.
5. App record missing in App Store Connect or Google Play Console
The app on the store side doesn't exist or was deleted. Create it again (see Part 2 Step 1 and Part 2 Step 2). Its identifiers must match your builder settings exactly.
6. Build timed out
Apple or Google was slow on the upload step. Trigger the build again. If it times out three times in a row, email help@membership.io, because that's a pipeline issue on our side.
7. OneSignal configuration for iOS
An important step needs to be done in iOS to make sure your app can be published. Review this video: https://app.membership.io/watch/xDWyrnlQqg
8. Google Play API not enabled
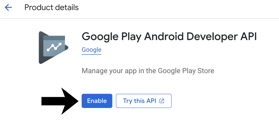
- Go to https://console.developers.google.com/apis/api/androidpublisher.googleapis.com/overview.
- Click Enable, as shown below.
9. Apple agreements aren't complete
- Go to https://appstoreconnect.apple.com/.
- Click Business (https://appstoreconnect.apple.com/business).
- Make sure you've completed all the Agreements.
- Also make sure you've accepted the agreements in your developer account at https://developer.apple.com/account.
10. App Group missing from your Apple Developer identifier
Follow along with these steps to make sure your App Group is configured. The written steps are in the "Configure the App Group" section of Part 2 Step 1.
11. My app is already published. Can I still update my Hub URL?
Yes, although it's easier to update your Hub URL before you publish your app. If you've already started the mobile app process:
- Update the domain in your Membership.io settings.
- Trigger a new build from the builder dock so it picks up the new domain.
That build is submitted to the store as a version update, so Apple and Google review it again before it goes live. Until members download that update, the existing app still points at the old domain, so deep links into the Hub won't resolve correctly until they update. If you're changing domains after launch, it's worth giving your audience a heads-up.
12. Google Play Console isn't registered as an organization
Make sure your Google Play Console is registered as an organization, not a personal account. If you didn't complete a D-U-N-S number (see Part 1 Step 1), you haven't finished registering as an organization. You can double-check in Google Play Console at https://play.google.com/console.
- In Google Play Console, go to Settings (left sidebar), then Developer account.
- Scroll up to find Account details.
- In the Website field, enter your website URL.
- Click Send verification request. This prompts you to verify ownership in Google Search Console.
- Go to https://search.google.com/search-console.
- Click Add property.
- Select URL prefix, enter your full website URL, and click Continue.
- On the Verify ownership screen, choose a way to verify your site. If you have a custom domain, the easiest route is to scroll down to Other verification methods and expand Domain name provider.
- If your domain is managed through Cloudflare, it appears as the default option. Click Start Verification and log in to your Cloudflare account when prompted.
- Keep the tab open and wait for verification to complete.
- Return to Google Play Console, then Settings, then Developer account, then Account details. Your website now shows as verified.
If your error isn't listed here
Take a screenshot of the build status panel and email it to help@membership.io. Don't keep publishing again, because each duplicate failed build still counts against your build credits.
Step 2 - Test your app on a real device
Install your app on your own iPhone and Android device before you ship.
Before you ship to the App Store and Play Store, install your app on your own phone first. Apple and Google both have built-in testing tracks for exactly this. Your iOS build lands in TestFlight automatically after Part 4 Step 1. On Android, you add your build to Internal testing yourself.
2A - Test on iPhone with TestFlight
TestFlight is Apple's beta install tool. Once your iOS build finishes processing in App Store Connect (about 15 to 30 minutes after upload), you can install it through the TestFlight app on any iPhone or iPad.
Find your build
- Sign in to https://appstoreconnect.apple.com.
- Click My Apps, then click into your app.
- Click the TestFlight tab at the top.
- Find the build you shipped under iOS Builds. If it's marked "Processing", wait another 5 to 10 minutes and refresh.
- Once it's "Ready to Test", click into the build and fill in the test information Apple requires (description, what to test and contact email).
Invite yourself as a tester
- In the TestFlight sidebar, click Internal Testing.
- Click the plus (+) next to Testers and add your Apple ID email.
- Click into the new tester group, click Builds, and add the build you uploaded.
Install the app on your iPhone
- Install the TestFlight app from the App Store (free, by Apple).
- Open your email and find the invite from TestFlight.
- Tap View in TestFlight. It opens the TestFlight app.
- Tap Install. Your app downloads and installs.
NOTE: Internal testers (Apple Developer team members) get builds as soon as Apple finishes processing them, with no review needed. If you add external testers (anyone outside your Apple Developer team), Apple runs a separate beta review that takes 24 to 48 hours.
2B - Test on Android with Internal testing
Your Android build doesn't land in Internal testing. After Part 4 Step 1, it's uploaded to the Production track as a draft release. That draft is what you'll send for review in Part 4 Step 3. To test the same build first, add it to Internal testing.
IMPORTANT: Don't discard the draft release in Production. It holds your build, and you'll need it when you submit.
Start the internal test
- Sign in to https://play.google.com/console.
- Click into your app.
- In the sidebar, expand Test and release, then Testing, and click Internal testing.
- Click Create new release.
- Under App bundles, click Add from library and select the build from Part 4 Step 1.
- Click Next, then Save.
- Click Review release, then Start rollout to Internal testing, and confirm.
[CONFIRM: that adding the Production draft build to Internal testing with Add from library works as written and leaves the Production draft in place.]
Add testers
- On the same Internal testing screen, click the Testers tab.
- Under Testers, click Create email list.
- Give the list a name (for example "Internal Team"), paste in tester emails (one per line), and click Save changes.
- Check the box next to your new list and click Save changes again.
- Scroll up to How testers join your test and copy the opt-in URL.
Install the app on your Android device
- Open the opt-in URL on the device, in Chrome, signed in with the same Google account.
- Tap Become a tester, then tap Download it on Google Play.
- When the Play Store shows your app, tap Install.
NOTE: Internal Testing rolls out to your tester list within a few minutes once Google finishes processing the build. Other test tracks are available but need more setup. Internal Testing is all you need for now.
What to check before you submit
- The launch screen looks right.
- Login works.
- A push notification arrives when you trigger one.
- Your Hub content loads.
- The status bar matches your branding (this is the part the live preview can't show you).
💡 TIP: Test on at least one iPhone and one Android device before submitting for review. Check that: The launch screen looks right. Login works. A push notification arrives when you trigger one. Your Hub content loads. The status bar matches your branding (this is the part the live preview can't show you).
Step 3 - Submit for review
Submit your app to Apple and Google for review.
Apple and Google both review every app before it goes live to the public. Apple is famously thorough (typically 24 to 48 hours, occasionally longer). Google is usually faster (a few hours to a few days), but its first-time review tends to be strict on policy compliance. Review times are set by Apple and Google and can vary.
You can submit both reviews in parallel, because they're independent.
3A - Submit to the App Store (iOS)
Most of the metadata work happens before you click submit. Block out 30 to 60 minutes for this, because Apple won't let you submit until every required field is filled in. Much of it should already be done from Part 3 Step 1.
- In App Store Connect, open your app and click the App Store tab.
- Under iOS App in the sidebar, click 1.0 Prepare for Submission.
- Fill in every section. The required ones are listed below.
- Description: What your app does, in your members' voice. 4,000 character limit.
- Keywords: Comma-separated, no spaces. 100 character limit.
- Support URL: A page on your website with contact info.
- Marketing URL: Optional. Your Hub URL works.
- Privacy Policy URL: Required. It must be a real, accessible page.
- App Icon: Pulled automatically from your build (the one from your builder).
- Screenshots: Upload the ones you made in Part 1 Step 4.
- Promotional Text: Optional, a 170-character "what's new" blurb.
- App Review Information: A name, email and phone number for Apple's reviewer to reach you. Add a demo account login under "Sign-in required", because Apple's reviewer needs a way into your gated content.
- Version Information: Release notes for this version.
- Age Rating: Answer the questionnaire honestly. Membership content with user-generated discussion typically lands at 12+ or 17+.
- Build: Click + Build under Build and select the iOS build from Part 4 Step 1.
- Once every section has a green checkmark, click Add for Review in the top right.
- Answer Apple's content rights and ad ID questions on the next screen.
- Click Submit to App Review.
NOTE: Most rejections come from three things: a missing privacy policy, a demo account that doesn't work for the reviewer, and crashes on the reviewer's device. If you're rejected, Apple tells you exactly what failed in the Resolution Center inside App Store Connect. Fix it and resubmit. You only need a new build when something inside the app itself has to change, such as a crash fix. For the rejections Membership.io apps get most often, see Guideline 3.1.1 (In-App Purchase), Guideline 1.2 (User-Generated Content) and Guideline 2.1 (Information Needed).
You can check status from the App Store tab. The version line at the top shows "Waiting for Review", "In Review", "Pending Developer Release" (you control when it goes live) or "Ready for Sale" (live).
💡 TIP: If you'd rather have the Membership.io team handle the reviewer for you, the Publish Guarantee is available for $1,999. You complete the steps, then the team audits your finished submission package, submits it for you, and handles all communication with Apple's and Google's reviewers until your app is accepted. It comes with a full refund if your app isn't published, and calls aren't included. To get it, email help@membership.io.
💡 TIP: If you want to coordinate your launch with an announcement, choose Manually release this version instead of Automatically release when you submit. That way, even after Apple approves it, your app stays unlisted until you click the release button.
3B - Submit to Google Play (Android)
Google Play splits the submission into two halves: a one-time store listing and content pass, and the actual production release.
Fill out the store listing (if you haven't yet)
- In Google Play Console, open your app.
- In the sidebar under Grow, click Store presence, then Main store listing.
- Fill in every required field, listed below.
- App name (max 30 characters)
- Short description (max 80 characters)
- Full description (max 4,000 characters)
- App icon (upload)
- Feature graphic, 1024 x 500 PNG or JPG (see Part 3 Step 2)
- Phone screenshots, from Part 1 Step 4
- Tablet screenshots (optional but recommended)
4. Click Save.
Complete the policy and content sections
Google blocks production releases until these are all green.
- In the sidebar under Policy, click App content.
- Work through every line: Privacy Policy URL, Ads declaration, App access (provide demo credentials if your app is gated), Content rating, Target audience, News declaration, Data safety and Government apps. Each has a short questionnaire, so fill them all in.
Create the production release
- In the sidebar under Test and release, go to Production. Your build from Part 4 Step 1 is waiting there as a draft release. Open the draft to edit it [CONFIRM: button label Play Console shows on the draft release, for example Edit release].
- Under App bundles, check that your build is listed. If it isn't, click Add from library and select it.
- Fill in Release name. It defaults to the version number, which is fine to leave.
- Fill in Release notes in the text box (per language).
- Click Next, then Save.
- Click Review release. Google runs a pre-launch check.
- If everything is green, click Start rollout to Production.
- Confirm. Your app is now in review.
NOTE: Google runs a Pre-launch Report on every build, automatically testing your app on a handful of physical devices in its lab. The report appears under Test and release, then Pre-launch report, within a few hours. It's worth checking even before review finishes, because it can catch crashes you didn't.
The first production release for a new app triggers a full content review (typically 1 to 7 days). Later releases usually clear in hours. You'll get an email when it's approved, and by default the app goes live automatically once approved.
If you want to hold approved releases for a coordinated launch (the way Manually release works on Apple's side in 3A), turn on Managed publishing in your Play Console account settings before you submit. Approved releases then wait until you click Publish on the Publishing overview page.
After approval
When both stores approve your app, you'll have a real, live, native iOS and Android app for your Hub. From here, every change you make in the builder goes through the same cycle: build (Part 4 Step 1), test (Part 4 Step 2) and submit (this step). Each round is much faster now that all your accounts are connected.
Congratulations! 👏 You've finished all four Parts. Your app is built and tested, and it's on its way through review at Apple and Google.
Take It Further …
-
Common App Store Rejections and How to Fix Them
What the 3.1.1, 1.2 and 2.1 messages from Apple mean and how to reply to the reviewer.
➡️ Read the rejections guide -
Send Push Notifications From Your Mobile App
Your app is live, so now you can reach your members right on their phones with announcements, new content and reminders.
➡️ Read the push notifications guide