
🧰 What You Will Need:
-
Your Apple Developer account from Part 1 Step 2, logged in as the account owner (not an admin or team member)
-
Your Google Play Console developer account from Part 1 Step 1, and the same Google account you used to set it up
Guide Purpose
Part 2 connects your Apple and Google developer accounts to Membership.io, creates your app in both stores and sets up push notifications. Follow the steps in order, because each one builds on the last.
Table of Contents
➡️ Feel free to click on any link to dive deeper into what's being mentioned.
- Set up Apple App Store Connect
- Set up Google Play Console
- Set up push notifications
- Review your work
Step 1 - Set up Apple App Store Connect
Connect App Store Connect to Membership.io and create your iOS app.
App Store Connect is Apple's platform for managing iOS apps. Think of it as your app's back office: it's where you'll submit your app for review, monitor downloads and manage your listing. Before any of that can happen, you need to connect it to Membership.io.
You'll collect three things from Apple and add them to Membership.io: an API key, your Team ID and a Bundle ID. This step walks through each one, then shows you how to create your app in App Store Connect.
Before you start
- You must be logged in as the account owner, not as an admin or team member. Nobody other than the account owner can complete this step. If you set up your Apple Developer account in Part 1 Step 2, you're already the right person.
- Log in to App Store Connect at appstoreconnect.apple.com.
- Check for pending agreements. Apple periodically updates its developer agreements, and if you haven't accepted the latest one, things stop working without much warning. Each time you log in, check App Store Connect and Apple Developer for pending agreement notifications. Only the account owner can accept them.
Part A - Generate your App Store Connect API key
The API key gives Membership.io permission to upload builds to your Apple account. You'll generate it in App Store Connect, download it, and upload it to Membership.io. It only takes a few minutes.
IMPORTANT: Apple only lets you download the .p8 key file once. Don't close the page or navigate away until you've saved it.
- In App Store Connect, open Users and Access.
- Click Integrations.
- Open App Store Connect API. You can also go there directly: https://appstoreconnect.apple.com/access/integrations/api.
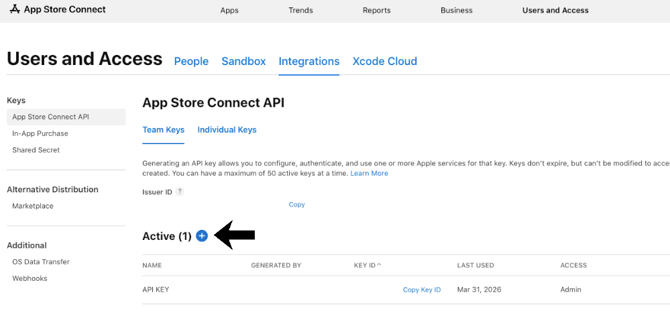
- Click the plus (+) button to generate a new key.
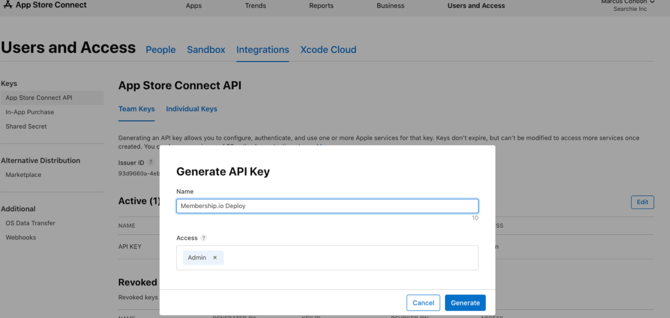
- Give it a name you'll recognize, for example "Membership.io Deploy".
- Set the access role to Admin.
- Click Generate.
- Download the .p8 file immediately. This is your one chance.
🔴 Watch: Creating your App Store Connect API key (.p8 file) (Loom video)
💡 TIP: If you ever lose the .p8 file, it's not the end of the world. You can revoke the old key (click Edit, then Revoke) and generate a new one. Save it somewhere safe the first time so you don't have to.
Part B - Upload your .p8 file and key details to Membership.io
- Open your Membership.io Hub in a new tab.
- Go to your Hub Dashboard.
- Expand the Mobile App menu.
- Select the Settings tab.
- Upload your .p8 file in the Apple tab right away. Don't let it sit in your Downloads folder.
- Go back to the API keys page in App Store Connect.
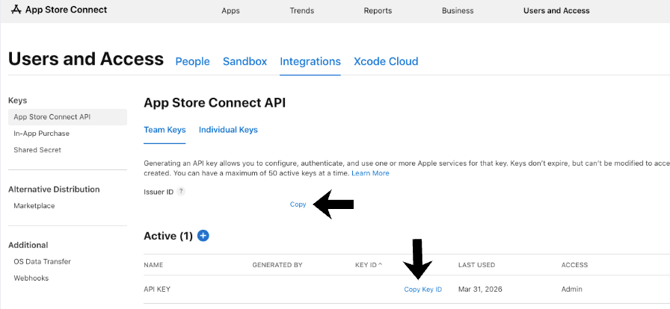
- Copy the Key ID using the copy button next to the key name, and paste it into Membership.io. It looks like this: A1B2C3D4E5
- Copy the Issuer ID shown at the top of the API keys page, and paste it into Membership.io. It looks like this: 12345678-abcd-efgh-ijkl-123456789012
Part C - Copy your Apple Developer Team ID
Your Team ID is a 10-character code Apple assigned to your account when you enrolled. You're not creating anything here, only finding and copying a value that already exists.
- Go to https://developer.apple.com/account and sign in. This is the same Apple account as App Store Connect, on a different website.
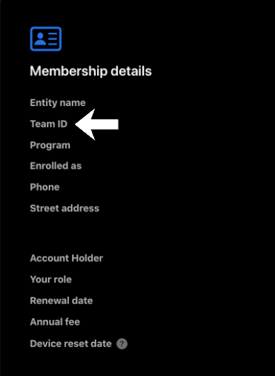
- Scroll down to your account details (Membership details).
- Copy your Team ID. It looks like this: ABCDE12345
- Paste it into Membership.io.
NOTE: Do not click the plus (+) button on this page. The Team ID was assigned automatically when your developer account was created, so you only need to copy it.
Part D - Create your Bundle ID
The Bundle ID is a unique identifier for your app. It tells Apple (and Google) that this specific app belongs to you. You create it once, and you'll use it for both stores.
Path: developer.apple.com, then Account, then Certificates, IDs & Profiles, then Identifiers.
- On the same developer.apple.com page, scroll up and click Identifiers.
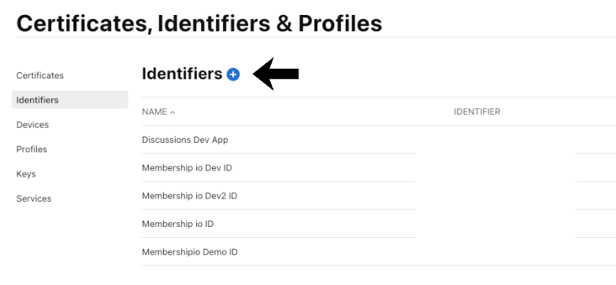
- Click the plus (+) button to register a new identifier.
- It defaults to "App IDs". Keep clicking through: App IDs, then App, then Continue.
- Enter a description. This is only for your own reference, so anything works.
- Select the Explicit type.
- Enter your Bundle ID.
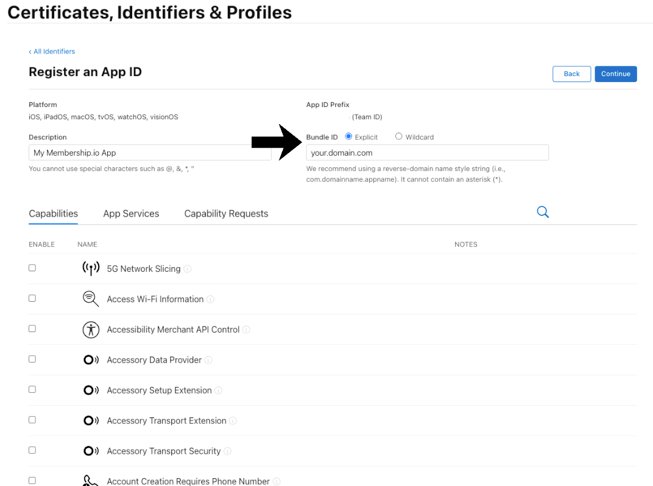
💡 TIP: We recommend using your domain as your Bundle ID, for example yourdomain.com. Type it as-is, with no spaces and no capital letters. You'll use this same identifier on Google Play too, so choose something that makes sense for your brand.
Enable four capabilities
Before you save, scroll down the capabilities list and check all four of these:
- App Groups
- Associated Domains
- Push Notifications
- Inside Push Notifications, also check Broadcast Capability
Configure the App Group
After checking all four capabilities, configure the App Group you enabled before you save. The steps are below, or you can watch this video that covers this section starting from https://developer.apple.com/account.
- Click Configure next to App Groups.
- Click Register an App Group.
- Under Identifier, paste your Bundle ID. The system automatically adds "group." to the front.
- At the end of the identifier, add .onesignal so it reads: group.yourbundleid.onesignal
- Under Description, enter something simple like: Mobile App
- Click Continue, then Register.
- Go back to your Bundle ID registration and click Continue.
- Review the confirmation page, then click Register to save your Bundle ID.
NOTE: Skipping the App Group won't block you now, but the build will fail in Part 4 when you press Publish. Get it done here while you're already on this screen.
Part E - Create your app in App Store Connect
Now that the Bundle ID exists, you can create the actual app listing.
Path: appstoreconnect.apple.com, then Apps.
- Switch back to App Store Connect and open the Apps tab.
- Click the plus (+) button, then New App.
- Select iOS as the platform.
- Enter your app name. This is what people will see on the App Store.
- Select your primary language.
- Select the Bundle ID you created. It should appear in the dropdown.
- For SKU, use the same value as your Bundle ID. It's only an internal reference.
- Set User Access to Full Access.
- Click Create.
NOTE: Your app name must be unique across the entire App Store, with a 30-character maximum. Before you type it in, search both the Apple App Store and Google Play Store to confirm nobody else is using it. If your preferred name is taken and you have a trademark, you can submit a claim, but check first so you're not surprised.
Your app now exists in App Store Connect. The icon auto-generates from your Hub's favicon. Your custom icon from the builder (Part 1 Step 6) is added when you build your app.
What happens when you press Build
Once all your credentials are in Membership.io and you press Build (covered in Part 4 Step 1), your app goes straight to TestFlight, Apple's testing environment. You'll see it in App Store Connect with a version number, ready to test on your phone before it goes public.
For your first version, you'll need to manually click Submit for Review in App Store Connect after you've verified it in TestFlight. Part 4 Step 2 covers testing, and Part 4 Step 3 covers submitting.
Store listing details (screenshots, description and keywords) are covered in Part 3 Step 1.
Step 2 - Set up Google Play Console
Give Membership.io the credentials it needs to upload your Android app.
The Google side has a few more moving parts than Apple, but the logic is the same: you're giving Membership.io the credentials it needs to upload your Android app on your behalf. There are three pieces: the app itself, a Google Cloud project, and a service account with a JSON key.
Don't worry if you've never heard of a service account or a JSON file. This step explains each one as you go.
Part A - Create your app in Google Play Console
- Go to play.google.com/console and log in with the same Google account you used to set up your Play Console developer account in Part 1 Step 1.
- Click Create app.
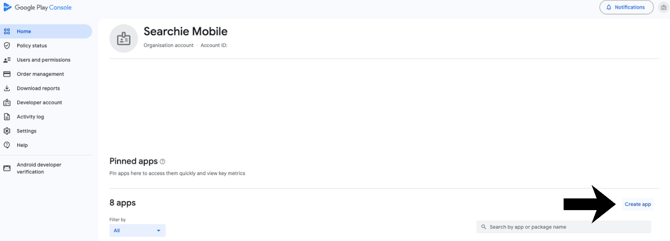
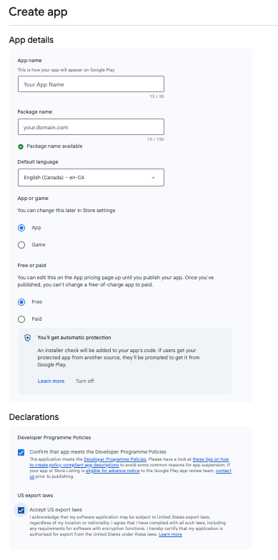
- Enter your app name. Use the same name as your Apple app.
- Enter the Package name. Use the same value as your Apple App ID (Bundle ID).
- Select your primary language.
- Select App (not Game).
- Select Free.
- Accept the declarations. These are standard content policy and export compliance checkboxes.
- Click Create app.
💡 TIP: Always select Free, even if your membership is paid. Your app is what's called a "reader app": members download it for free and access content they've already purchased through your Hub. You aren't selling anything through the app store itself, so the app is always free to download.
Your app now exists in Google Play Console. Store listing details (screenshots and description) are covered in Part 3 Step 2.
Part B - Create a Google Cloud project
Google requires a Cloud project before you can create the service account Membership.io needs. Google Cloud does a lot of things (databases, email infrastructure, VPNs) and it can feel overwhelming at first. Don't let it distract you: you're here for one thing, and it takes about two minutes.
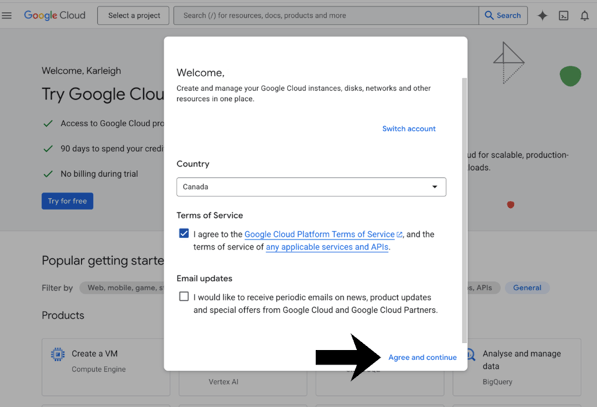
- Go to console.cloud.google.com. If you're using Chrome and logged in to your Google account, you'll be logged in automatically.
- If you're new to Google Cloud, accept the Terms of Service.
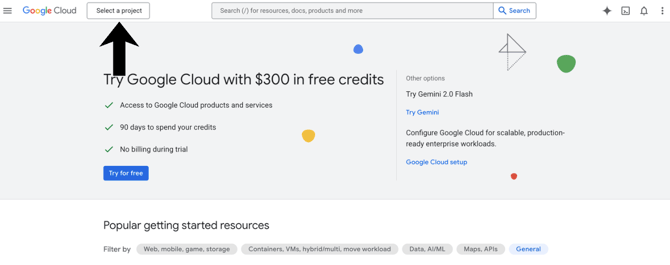
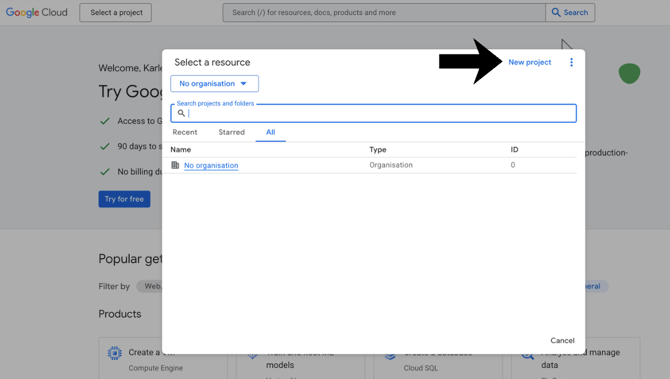
6. Click Create.
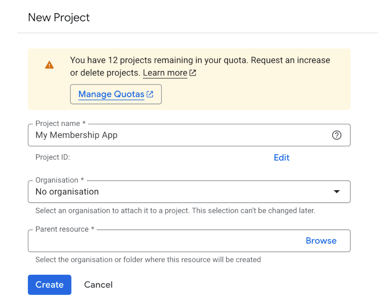
NOTE: You must create the project before you can create a service account. This step is easy to skip over, so don't. If you try to create a service account and can't find the right screen, it usually means this step wasn't done first.
The project name doesn't affect how anything works. It's a label for your own reference.
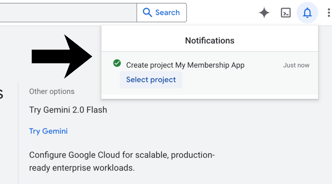
- Wait for the notification that your project has been created.
- Click Select project.
Part C - Enable the Google Play Android Developer API
Before you create a service account, the Google Play Android Developer API must be enabled in your Cloud project.
- Go to https://console.developers.google.com/apis/api/androidpublisher.googleapis.com/overview.
- Make sure your project is selected in the top dropdown.
- Click Enable.
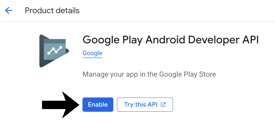
That's it for this part. This lets your service account communicate with Google Play, so the Publish App button works inside Membership.io.
Part D - Create a service account
A service account is a special type of Google account that isn't tied to a person. It's designed for software to use. Membership.io needs one so it can communicate with your Google Play account and upload your app automatically. Think of it as a dedicated "robot" account that does this one job.
- From console.cloud.google.com, click IAM & Admin.
- Open Service Accounts.
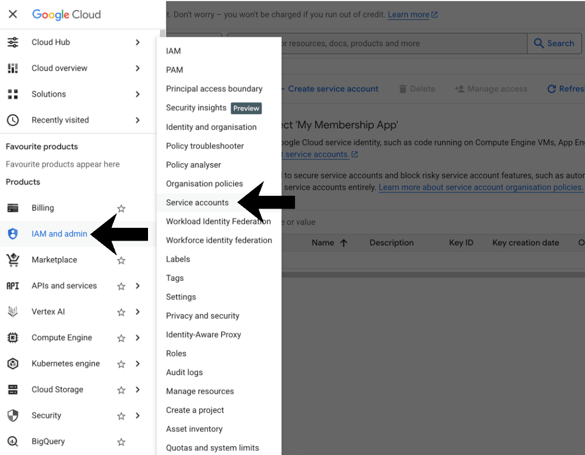
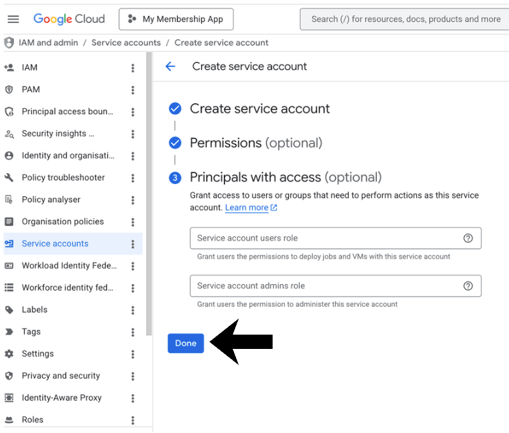
- Click Create Service Account.
- Name it membership.io. This makes it easy to identify later when it shows up in your users list.
- Click Create and Continue.
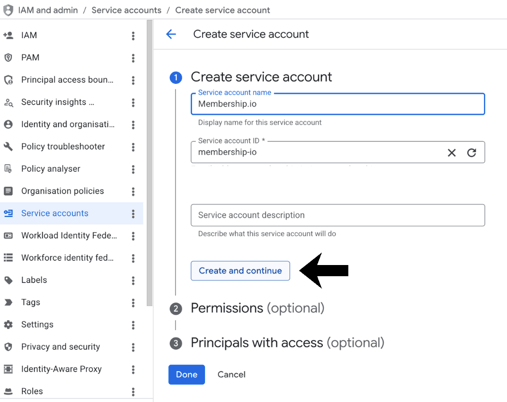
- Click Continue without filling in anything for the role (Permissions).
- Click Continue without filling in Principals with access.
- Click Done.
- Refresh the page. Some browsers don't refresh automatically, and the service account won't appear in your list until you do.
Part E - Download the JSON key
Now you'll generate a key for the service account. This is the file you'll upload to Membership.io. A JSON file is a standard format for storing credentials. You don't need to open or understand it: download it and upload it.
- Copy the service account email you created and save it. You'll need it in Part G.
- Click the service account email to open it.
- Go to the Keys tab.
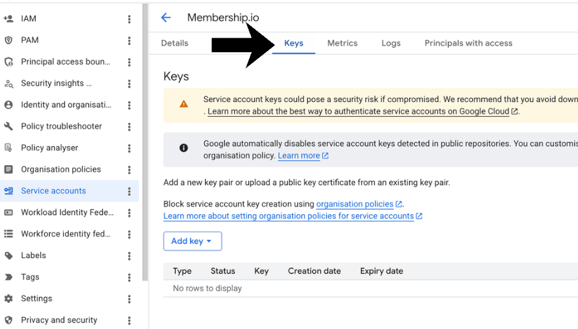
- Click Add key, then Create new key.
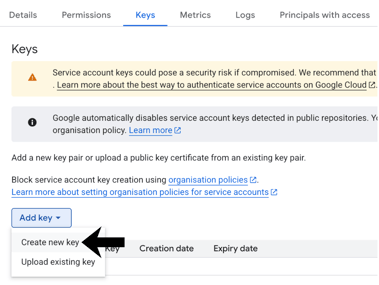
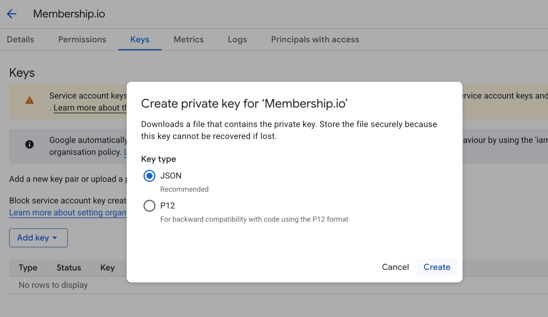
- Choose JSON.
- Click Create. Your private key is now saved to your computer.
🔴 Watch: Creating your Google Cloud service account JSON key (Loom video)
NOTE: Make sure you select JSON, not P12. When you click Create, the file downloads automatically, and there's no separate download button. Check your Downloads folder right away.
Part F - Upload the JSON key to Membership.io
- Go to your Hub menu in Membership.io.
- Click the Mobile menu to open the page.
- Upload the JSON file in the Google tab immediately, the same way you uploaded the Apple .p8 file in Part 2 Step 1. Don't let it sit in your Downloads folder.
Part G - Invite the service account to Google Play Console
Creating the service account in Google Cloud isn't enough on its own. You also have to give it permission to access your Play Console. You do this by "inviting" it the same way you'd invite a team member.
The email address looks like a robot wrote it. That's normal, and it's how Google connects the two systems.
- Go back to play.google.com/console.
- Under Users & Permissions, open Invite new users.
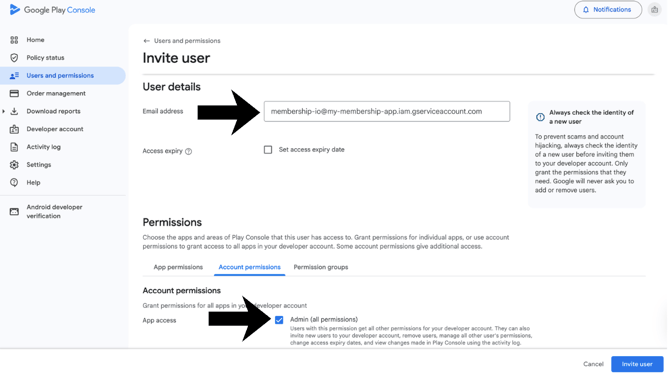
- Paste the service account email you saved in Part E. It will look something like membership-io@my-membership-app.iam.gserviceaccount.com. Don't copy this example: use the unique service account email from your own account.
- Under Account permissions, select Admin.
- Under App permissions, click Add app.
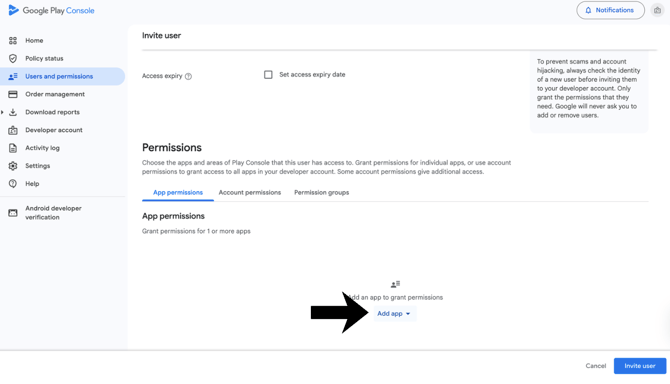
- Select the app you created in Part A.
- Click Apply, then click Apply again to confirm the permissions.
- Click Invite user, then Send invitation.
Service accounts are accepted automatically, so you won't receive an email confirmation. Permissions can take up to 24 hours to fully take effect on Google's end. If something doesn't seem to work right away, give it some time before troubleshooting.
Step 3 - Set up push notifications
Upload your Apple and Google push credentials so your app can send notifications.
Push notifications keep your members coming back: new content drops, replies on their posts and live event reminders. Before your app can send a single push, Apple and Google both need to issue you credentials, which you then upload into the Mobile App Builder.
This step has two halves:
- Apple side: Generate an APNs Auth Key, then upload it.
- Google side: Create a Firebase project and service account, then upload the key.
Take them one platform at a time.
💡 TIP: The push files are different from the files you created in Steps 1 and 2. Your APNs Auth Key is a second .p8 file, separate from your App Store Connect API key, and your Firebase key is a second .json file, separate from your Google Cloud service account key. Give each file a clear name when you save it, so you can tell them apart.
NOTE: You only need to set up push once per developer account on each side. The APNs Auth Key works for every iOS app on your Apple Developer account, and a Firebase project lasts forever.
3A - Generate your APNs Auth Key (Apple)
The APNs Auth Key is a small .p8 file from Apple. It lets the Membership.io push service authenticate with Apple's Push Notification service to deliver notifications to your members.
Before you generate the key, double-check that your Bundle ID has Push Notifications enabled. This is the number one reason push silently fails later on.
Confirm Push Notifications is enabled
- Sign in to https://developer.apple.com/account.
- In the sidebar, click Certificates, Identifiers & Profiles.
- Click Identifiers and find the Bundle ID you registered in Part 2 Step 1.
- Click into it and scroll to Capabilities.
- Confirm Push Notifications is checked. If it isn't, check it and click Save in the top right.
Generate the key
- Back in Certificates, Identifiers & Profiles, click Keys in the sidebar.
- Click the blue plus (+) button next to the Keys heading.
- Give the key a name, something like "Membership.io Push".
- Check the box for Apple Push Notifications service (APNs).
- Click Continue, then Register.
- On the next screen, click Download. This saves a file called AuthKey_XXXXXXXXXX.p8 to your computer.
- Copy the Key ID shown on this page (10 characters, uppercase letters and numbers). Paste it into a notes doc, because you'll need it in 3B.
🔴 Watch: Creating your Apple Push Notifications service (APNs) key (Loom video)
IMPORTANT: The .p8 file can only be downloaded once. If you lose it, you'll have to generate a new key. Save it somewhere safe, such as a password manager.
💡 TIP: Your Team ID is already in Membership.io from Part 2 Step 1, so you won't need it again here.
3B - Upload your Apple push credentials (Membership.io)
- In your Hub Settings, open the Mobile App Builder.
- Open the notifications panel.
- Open the iOS push credentials editor (Add Credentials under iOS Push Notifications).
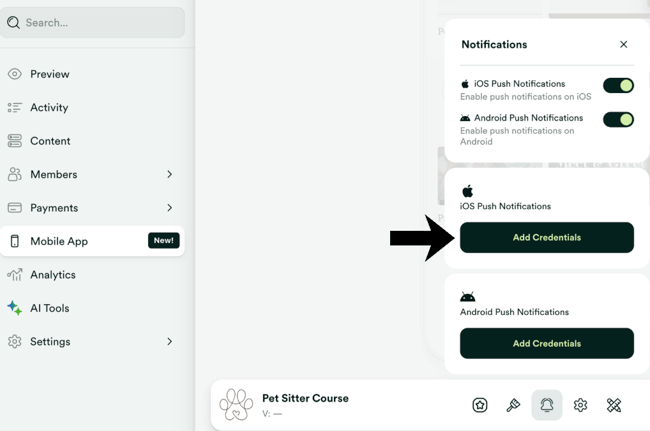
- Upload the .p8 file you downloaded in 3A.
- Paste in your 10-character Key ID.
- Save.
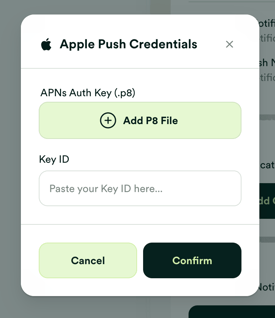
Once it saves, the panel shows that your iOS push credentials are on file.
3C - Create a Firebase project and generate a service account (Google)
For Android, Google handles push through Firebase Cloud Messaging (FCM). You'll create a Firebase project, link it to your Android app, then download a service account key that authorizes our build service to send pushes on your behalf.
Create the Firebase project
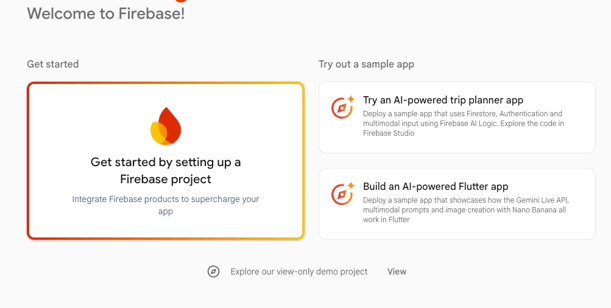
- Go to https://console.firebase.google.com.
- Click Add project. It might instead say "Get started by setting up a Firebase project".
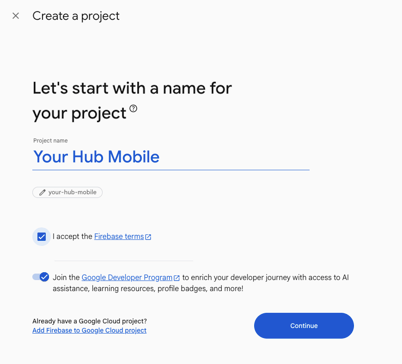
- Enter a project name (for example "Your Hub Mobile").
- Accept the Firebase terms.
- Click Continue.
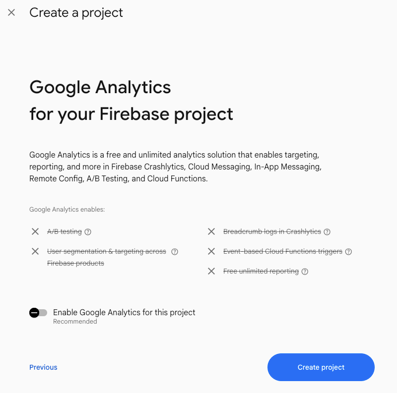
- Optional: toggle AI assistance on or off for your Firebase project.
- Google Analytics is optional. Toggle it off unless you specifically want it.
- Click Create project and wait about 30 seconds for it to finish.
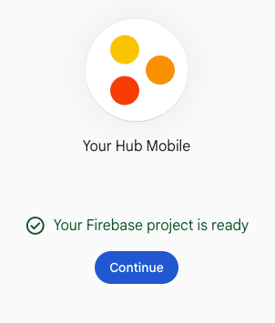
- Click Continue.
Add your Android app to the project
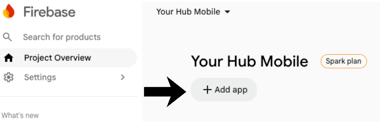
- On the project home page, click + Add app.
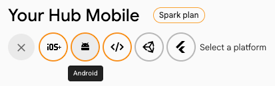
- Click the Android icon.
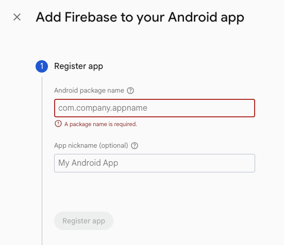
- In the Android package name field, paste the exact package name you used when you created your app in Google Play Console in Part 2 Step 2. It must match character for character, including capitalization.
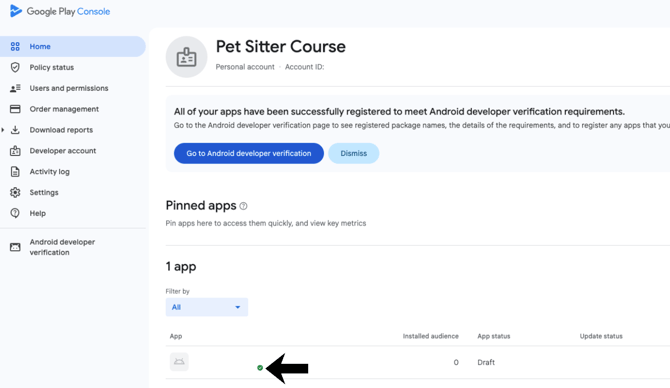
NOTE: If you didn't save your package name, you can find it in https://play.google.com/console below your app name.
- Fill in the app nickname if you want. It's optional.
- Click Register App.
- The next screen offers a google-services.json download. You can skip this, because it isn't needed.
- Click Next through the remaining setup screens until you're back on the project dashboard.
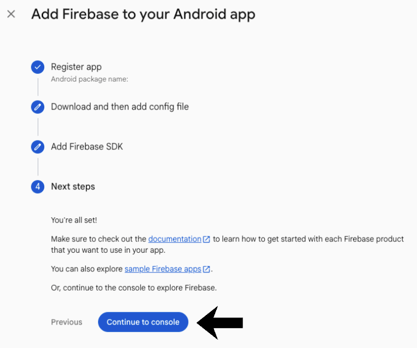
NOTE: The package name must match what's in your builder settings (and what's in Google Play Console). A mismatch here means pushes never arrive.
Generate the service account key
This is the file you'll upload to Membership.io.
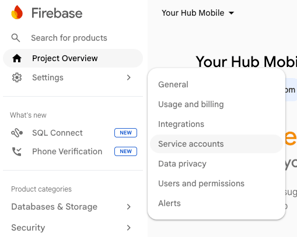
- In Firebase, click the gear icon next to Project Overview (top left) and choose Project settings.
- Click the Service accounts tab.
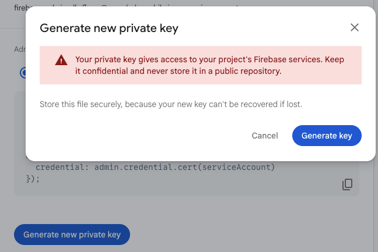
- Click Generate new private key.
- A confirmation window warns you to keep the key secret. Click the blue Generate key button.
- A .json file downloads to your computer.
🔴 Watch: Creating your Firebase service account JSON key (Loom video)
IMPORTANT: The .json file downloads only once. If you lose it, generate a new key from this same screen. The key grants full Firebase admin access for your project, not only push, so treat it like a password.
3D - Upload your Android push credentials (Membership.io)
- Go back to the notifications panel in the Mobile App Builder.
- Under Android Push Notifications, click Add Credentials.
- Upload the service account .json file you downloaded in 3C.
- Click Save.
Once it saves, the panel shows that your Android push credentials are on file.
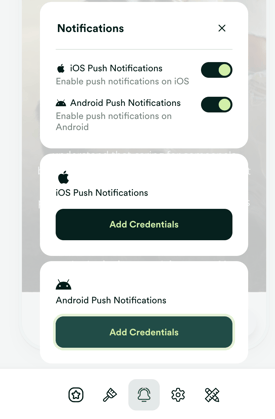
You're done with this step. Both platforms are now set up for push.
Step 4 - Review your work
Check your builder settings and everything from Steps 1 to 3 before you move on to Part 3.
Before you move on to Part 3, confirm that your builder settings are complete and that everything from Part 2 Step 1, Part 2 Step 2 and Part 2 Step 3 is done.
Confirm your builder settings
Go to your Hub dashboard, open the Mobile menu and click the Settings panel. This is where the identifiers and credentials from this part come together. Check that each of these is filled in:
- iOS Bundle ID: Your iOS app ID, created in Part 2 Step 1.
- Android Package Name: Your Android app ID, created in Part 2 Step 2.
- iOS Build Credentials: Your App Store Connect API key (.p8 file), Key ID, Issuer ID and Team ID.
- Android Build Credentials: Your JSON service account key and your Signing SHA-256 Fingerprint.
If you can't find a value, go back to Part 2 Step 1 or Part 2 Step 2 to retrieve it.
Where to find your Android SHA-256 fingerprint
- In Google Play Console, open your app.
- Go to Test and Release, then App Integrity.
- Scroll down to Play App Signing and click Settings in the top right of that section.
- Under App signing key certificate, click the copy button next to SHA-256 certificate fingerprint (the first one at the top).
- Paste it into the Android Build Credentials in the builder.
Before you move on
You're ready for Part 3 when all of these are complete:
- App Store Connect API key (.p8 file) downloaded and uploaded to Membership.io
- Key ID and Issuer ID copied and pasted into Membership.io
- Apple Team ID copied from developer.apple.com and pasted into Membership.io
- Bundle ID created with all 4 capabilities enabled (App Groups, Associated Domains, Push Notifications and Broadcast)
- App created in App Store Connect (name, language, Bundle ID and Full Access)
- App created in Google Play Console (name, language, Free, declarations accepted)
- Google Cloud project created
- Service account created and named "membership.io"
- JSON key downloaded and uploaded to Membership.io
- Service account invited to Play Console with Admin permissions and your app selected
- APNs Auth Key (.p8 file) generated and uploaded to the notifications panel with its Key ID
- Firebase project created, with your Android app added using the exact package name
- Firebase service account key (.json file) generated and uploaded to the notifications panel
- Bundle ID, package name and build credentials (including your SHA-256 fingerprint) filled in under Settings in the builder
Congratulations! 👏 You've finished Part 2. Your Apple and Google credentials are in Membership.io, your app exists in App Store Connect and Google Play Console, and push notifications are set up.
Take It Further …
- Mobile App Part 3: Configure Your App
Prepare your App Store Connect and Google Play Console listings so they're ready for your first build.
➡️ Continue to Part 3